Tuesday, November 2, 2010

Souptacular: Albondigas Soup

This fall/winter I have decided to dapple in making soups. As a kid, I never liked soup. When I was sick, I would ask for chili instead because I hated soup so much and it was as close as you can get, without getting the real thing. It wasn't until I went to a cooking class with a friend of mine that I realized, I don't like canned soup. Homemade soup is awesome! This had me excited for the weather to get cold so I could experiment with different types of soup. Look forward to more souptacular to come!

The first soup I decided to try came from my crock pot cookbook. Lately, I haven't been best friends with my crock pot. I have found that some recipes are simply perfect, while others are terrible. I've tried several chicken recipes and, even though they have different flavorings, they all tasted overcooked and bland. This made me stop using my crock pot for a while, but I brought it out for my first soup recipe, thinking crock pots were made for soup! I wish I had some special reason I picked this recipe, but it was mainly because I had some leftover pasta sauce that I didn't have any use for. Also, with all the vegetables, it seemed healthy. I made some changes to the original recipe, so here is what I did:

I had some chicken broth left over, but beef broth was on sale at the store, so I used half of each.

Then add chopped celery and carrots.

Add frozen corn.

This is why I picked this recipe actually. I had some of this spaghetti sauce left over from another recipe and didn't really know how to use it up (my husband doesn't like tomato sauce). Since this recipe has very little to just add some flavor, I don't think he even noticed it and I thought it was delicious.

Then add some meatballs. These were actually really good! I was expecting them to be sort of dry for some reason, and they were the opposite.

This is what it looks like once everything is poured in, before it is cooked.

Then wait.

The finished product!


Albondigas Soup:

4 cups chicken/beef broth
1 cup chopped carrots
3 celery stalks, diced
1/2 cup frozen corn
1/4 cup prepared pasta sauce
One package frozen meatballs, Italian or similar
1 cup frozen peas
shredded cheese (optional garnish)

Put broth, vegetables, and pasta sauce into your slow cooker. Stir in the frozen meatballs. Cover and cook on low for 8 to 9 hours. Stir in frozen peas 20 minutes before serving. Garnish with shredded cheese is desired.

Monday, October 18, 2010

MIA

Hello to those following my blog. I cannot believe it has been over a month since I posted something. I've had a cooking block, I guess I could say. I go through those every once in a while, but I have been inspired by the cool weather to start posting again. I usually try to post things I liked, but I think it could be fun to post my not-so-awesome recipes too. I have some new ideas that I think could be interesting, so please stay tuned!

Wednesday, September 8, 2010

Hubby's Snickers Ice Cream Birthday Cake!

My husband turned 26 this year and since it is our second time celebrating his birthday as a married couple, I was determined to make it better than the way I celebrated last year (I made cupcakes with a disaster of a frosting). He has been on a Snickers Ice Cream kick, so I started looking up ice cream cakes to see if he would like anything along those lines (he also responded to the question: "What type of birthday cake do you want?" with "A small one." I thought the ice cream cake might make him more excited.) I found two ice cream cakes of interest in my Family America's Test Kitchen book and asked him which he would prefer. He chose this Snickers Ice Cream Cake.

From the beginning, this cake was not going to be easy. I decided that I would make my own caramel sauce thinking that it would be much better than anything I could buy in the grocery store only to find a huge problem. Either my thermometer is WAY off, or the cookbook gave me the wrong temperature. I was to bring the sugar syrup up to 350* only to have it burn before it reached 340*. The first time, I blamed it on me not paying enough attention because it shot up incredibly fast. The second time I took it off at 340* because it was burnt. The third time, I went to the store. Maybe someday I will try to make a caramel syrup again, but today is not that day.

 My hubby's favorite-chocolate ice cream.

I couldn't find the cookies desired for the recipe, so I used cookies that had the cream filling and just took out the cream filling. Note to self: make sure you pay attention and don't buy the mint kind again.

 Soften the ice cream in a bowl.

Mix in the peanut butter.

This is what it looks like mixed.

Take a loaf pan and add a layer of cookies.

Then a layer of the ice cream mixture.

Then a layer of caramel sauce.

Then repeat with a layer of cookies.

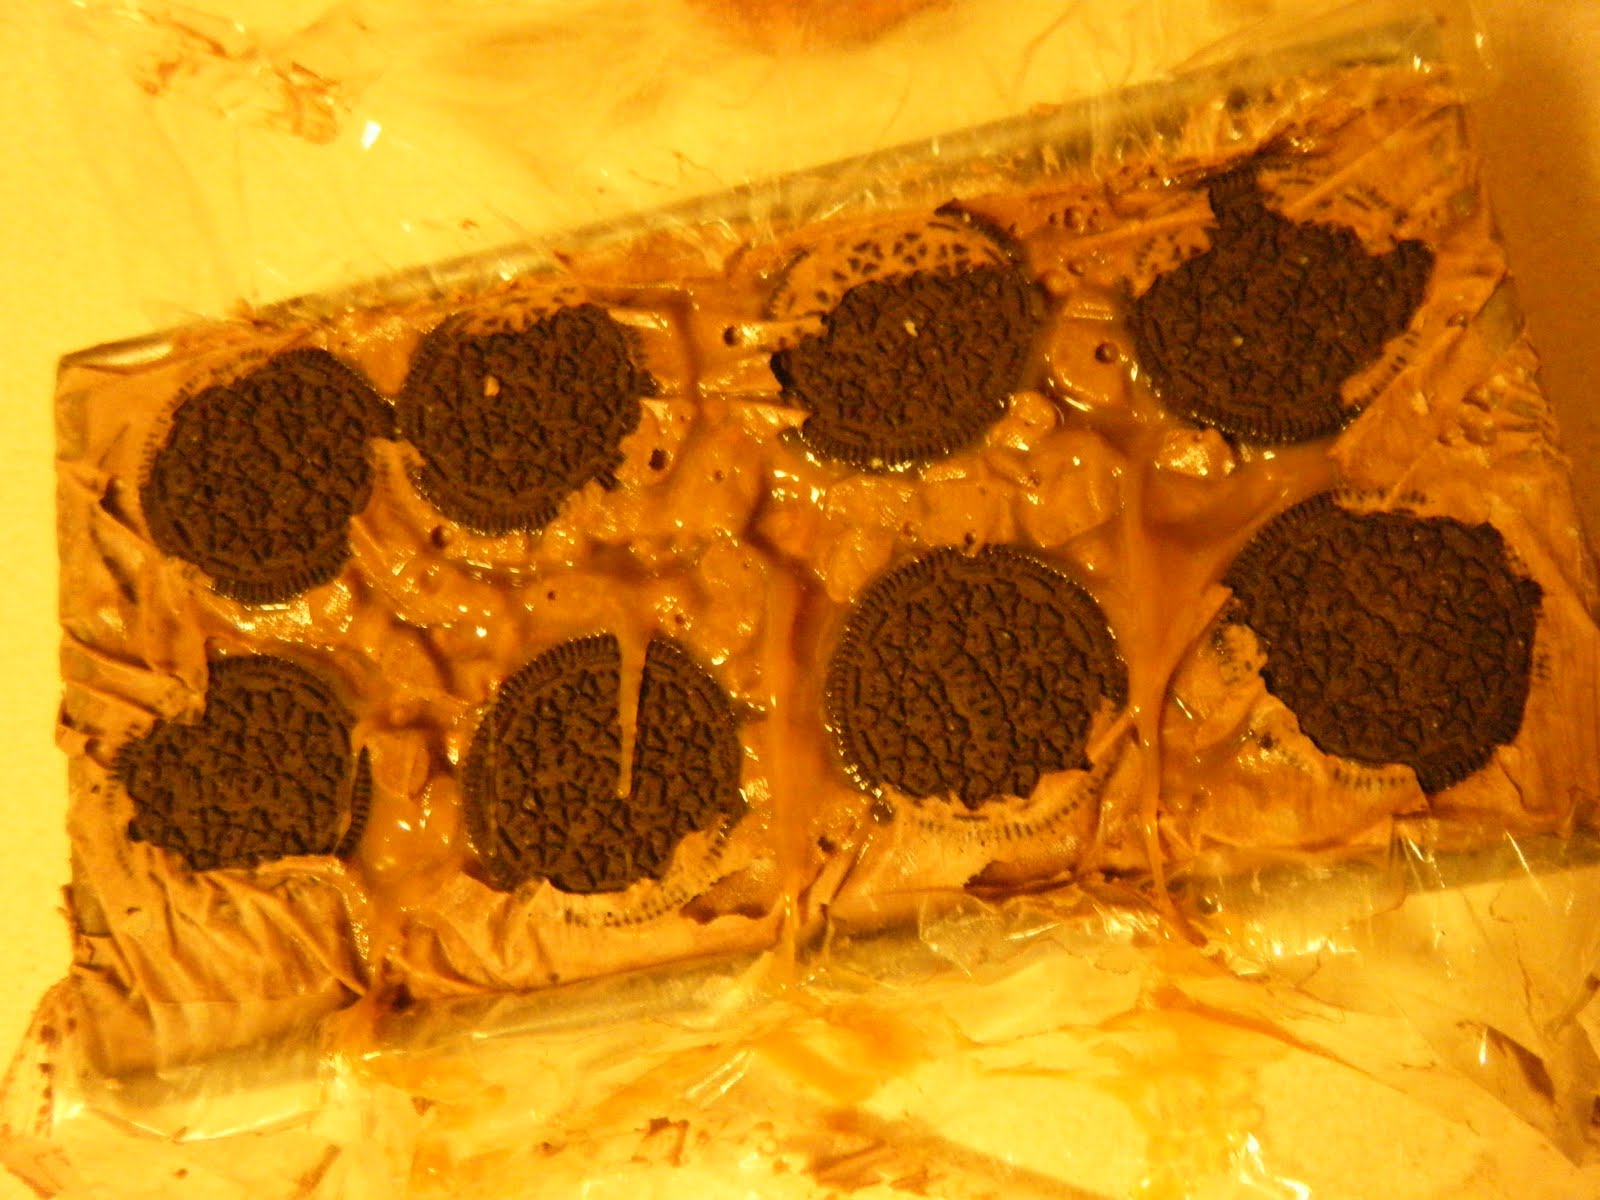
Wrap it in plastic wrap and put it in the freezer.

It comes out of the freezer looking like this.
 It is very difficult to cut into the huge log of ice cream, but worth the effort.

Doesn't it look yummy?! You can see the layers better in this picture.

Snickers Ice Cream Cake:

2 pints chocolate ice cream
1 cup chunky peanut butter
32 Nabisco Famous Chocolate Wafers
1 1/2 cups caramel or butterscotch sauce

1. Line a loaf pan with plastic wrap, letting the ends of the plastic wrap overhang the pan by 6 inches. Scoop the ice cream into a large bowl, then work to soften. Fold the peanut butter into the ice cream until uniformly mixed.
2. Working quickly, arrange 8 chocolate wafers to cover the bottom of the pan (some overlapping is fine). Spread one third of the ice cream mixture evenly over the wafers and smooth the top. Spread 1/2 cup of the caramel sauce over the ice cream. Repeat this layering process two more times. Finish by laying the 8 remaining wafers over the top and press them lightly. Wrap the pan tightly with plastic wrap and freeze until firm, about 6 hours. 
3. To serve, unwrap and gently tug at the overhanging plastic wrap to remove the loaf from the pan. (If necessary, dip the bottom of the pan into hot water.) Using the plastic wrap to handle the loaf, invert it onto a serving platter. Peel away and discard the plastic wrap. Allow the cake to sit at room temperature for a few minutes before slicing. 

Enjoy!


Sunday, August 29, 2010

BBQ Pizza

I've made pizza many times before. My M.O. seems to be to throw whatever I have left over onto a pizza, and it tends to turn out tasty. This time, I wanted to try BBQ pizza. It was still a hodgepodge of things I had in the fridge, but my husband loved it and that's all that counts!


I didn't have a recipe for this, but I used homemade pizza dough (that is key!), BBQ sauce, left over chicken from the Beer Can Chicken from the previous post, red bell pepper, shredded Mexican blend cheese, and cheddar cheese. As you can see, I also added a salad. :-)

Friday, August 27, 2010

Beer Can Chicken

As I said in an earlier post, I have been enjoying bringing out my new BBQ and putting it to work. This time, I decided to make use of the whole chicken that has been sitting in my freezer for far too long and make Beer Can Chicken. I have used this technique in the oven, but was excited to try it in the BBQ with a more smokey summertime flavor.


Here is a picture of my beautiful bird perched on the BBQ with a delicious rub coating it with a beer can helping it stand up straight. I think it look delicious even raw! For those of you that are interested, the foil under the grill is wood chips and the foil next to the chicken is filled with asparagus to accompany the chicken on our plate.


And a shot from the back to highlight the rub I used all over as well as inside the chicken.


I used my thermometer to make sure the chicken reached the appropriate temperature. The last time I made this in the oven, I did not have a thermometer and my chicken was raw in the middle. I love having a clear guarantee that my chicken is cooked through.


It looks good even with a prob in its side!


It was a little messy getting it off the grill and carving, but definitely worth the effort!


Beer Can Chicken:

4 cups wood chips, soaked and drained
Vegetable oil
1 (3 1/2 to 4 pound) whole chicken
3 Tablespoons Basic BBQ Rub
1 (12 ounce) can beer

1. Place the wood chips in a disposable aluminum tray and rest the tray directly on top of the primary burner. Turn all the burners to high, close the lid, and heat the grill until very hot and the chips are smoking, about 15 minutes. Clean and oil the grill. Leave the primary burner on high and turn off the other burner(s).
2. Meanwhile, remove and discard the gizzard packet inside the chicken and pat dry with paper towels. Rub the chicken inside and out with the spice rub, massaging it under the skin as well. Pour out (or drink) 1/4 cup of the beer. With a church-key can opener, punch two more large holes in the top of the can.
3. Slide the chicken onto the can do that it stands upright and position over the cooler part of the grill. Cover and grill-roast until an instant-read thermometer inserted deep into the thigh registers 165 degrees, 70 to 90 minutes, rotating the bird and can around half-way through. (The temperature inside the grill should remain between 375 and 350 degrees.)
4. Transfer the chicken and can to a carving board using clean potholders or kitchen towels, making sure to keep the can upright. Let the chicken rest on the can for 15 minutes.
5. Carefully lift the chicken off of the can, discarding the can and sny remaining beer and carve the roasted chicken. Enjoy!

Mind you, I used charcoal and just made sure to put the coals on either side of the BBQ leaving a space in between that would not be heated directly.

Tuesday, August 24, 2010

New Discovery!

I've seen so many commercials for Kashi, but never thought their products looked too irresistible to pass up in the grocery isle. I know they always said they only use the freshest ingredients, but I just always saw them as another cereal or granola bar company...until now.


While browsing the shelves for one of my favorite granola bars-fiber one chocolate. Very yummy!


I decided to see if there was something else I would like. That's when this caught my eye:

 I thought- I love chocolate with granola and I love coconut with chocolate. Why not give it a try? It was worth it! I love the creamy chocolate with the crunchy granola and the addition of the sweet coconut. I don't think this box is going to last much longer!

Saturday, August 21, 2010

Camping and Relaxation


Sorry for being MIA for a couple of weeks, but I was off camping for one week and getting my relaxing the second. The week of camping was awesome! I look forward to this camping trip every year and had a fabulous time with the family we went with. Camping is one of my favorite vacations because I think there is something special about taking the time to disconnect from all electronics (although there were some electronic connections this time) and sit around a fire with close friends to relax and talk. There is something so refreshing about not having your cellphone on or surfing the net. I think I would have enjoyed the era before all of these electronics because you get to know people more closely and honestly. Ever since I was in high school and had a curfew, I loved that with camping I never had to follow a schedule and was free to do anything I wanted whenever I wanted. Now, not following a schedule isn't as amazing, but still a great vacation. I usually spend my days camping by: lounging, reading, swimming (if it isn't freeeeezing!), eating, and spending time around the fire with friends. For all of those reasons, I love camping. With camping comes planning, which means food and baking! I want to share with you two of our favorite camping treats:

First is simple: Hot Cocoa Mix.
I don't think I have mentioned Alton Brown in my blog, which is very surprising to me since he is my favorite star on Food Network. I have yet to be disappointed in any of his recipes and have learned a lot about cooking from him. This is one of the first recipes I tried from his episodes and prefer it far over store-bought hot cocoa. There isn't really anything special to it. You basically just combine ingredients and add water, so it doesn't take much more effort than the store-bought versions.

2 cups powdered sugar
1 cup cocoa (Dutch Processed)
2 1/2 cups powdered milk                    
1 teaspoon salt
2 teaspoons cornstarch
1 pinch cayenne pepper

Combine all ingredients. When we're camping, we act as though it is store-bought cocoa by putting some in a cup and mix in boiling water.


The last recipe I want to share with you today is a camping staple because of it's popularity: Muddy Buddies!
I have heard this particular treat called several different names, but in my family, Muddy Buddies seems to be the chosen name. I am always asked if I made and brought some and it is always the first to disappear. I tend to only make them when we're camping in order to keep them a special camping treat and so I don't eat them all the time.

Muddy Buddies:
9 cups Chex cereal
1 cup semisweet chocolate
1/2 cup peanut butter
1/4 cup butter
1 teaspoon vanilla
1 1/2 cup powdered sugar

1. In a large bowl, measure out cereal. Set aside.
2. In a microwave-safe bowl, melt chocolate, peanut butter, and butter.Stir in vanilla. Pour mixture over cereal and mix until cereal is thoroughly coated.
3. Place cereal in a ziploc bag. Add powdered sugar. Shake until coated.


Although I wish I was still camping, I am happy to be home and these are things you can make whether or not you're camping.